Welcome to Chicago!
This week, you will use DrRacket to complete a simple locally-themed exercise, and submit it to us using subversion. As such, you will become acquainted with the CS151 work flow (which is similar to the work flow in CS152 and numerous other classes). Furthermore, you will gain some experience with Racket's graphics library.
The use of subversion necessary for this course (for handing in your work) is not complex or especially challenging, but it is important to get comfortable with it and get it right.
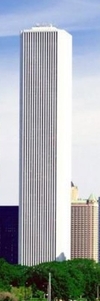
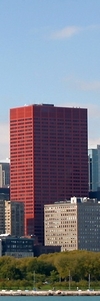
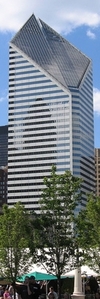
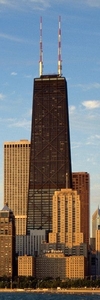
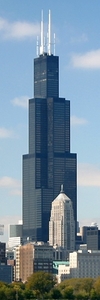
Chicago is full of landmark skyscrapers, some of which are pictured on this page. For this lab exercise, you will construct a simple model of the John Hancock Center (second from right above) from a given set of parts and then build a second model of the Chicago skyscraper of your choice.
The process of modeling a complex (i.e., not dead simple) shape, like the profile of Chicago's John Hancock Center, consists of composing that shape out of simple constituents by assembling them together with various operations like beside and above. We've deconstructed the Hancock Center for you; you'll do a second building on your own.
Getting Started
Check out your subversion repository. The following command will do this, substituting your own cnet for CNET ID:
$ svn checkout https://phoenixforge.cs.uchicago.edu/svn/CNET-cs151-aut-17
At this point, you should change into your directory with the command cd CNET-cs151-aut-17 (again, where CNET is not to be taken literally). Create the following two directories and commit them to the repository with the following sequence of instructions:
  $ svn mkdir include
  $ svn mkdir lab1
  $ svn commit -m "new directories"
The cs151-image library provides functions such as rectangle, circle, ellipse, etc. (This library is a thin wrapper around the preexisting library 2htdp/image. It has been slightly altered for the purposes of this course; we will discuss how later.) You build images out of these elemental parts by sticking them together, stacking them up, and stretching and squeezing them in various ways. For example, images can put together vertically and horizontally using the image operators above and beside, respectively. The cs151-core library include basic utilities to be used throughout the quarter; we will always use it in our work.
Save the files cs151-core.rkt and c151-image.rkt (linked below) into the directory CNET-cs151-aut-17/include you just created.
cs151-core.rkt
cs151-image.rkt
Then add and commit that file to your repository with the following commands:
  $ svn add include/cs151-core.rkt
  $ svn add include/cs151-image.rkt
  $ svn commit -m "core and image library"
The documentation for the 2htdp/image library on which cs151-image is based is available on the web at
http://docs.racket-lang.org/teachpack/2htdpimage.html
You will want to keep the documentation close at hand (i.e., open in a browser) throughout this exercise.
At this point, start DrRacket.
Part 1: The John Hancock Center
The following starter code includes definitions of individual image components that can be assembled together into a simple scale model of the Hancock Center. You should copy and paste this code into DrRacket's definitions pane, and save the file in CNET-cs151-aut-17/lab1 with the filename lab1.rkt. Please take care to name the file exactly lab1.rkt, with no spaces and no differences in capitalization.
  #lang typed/racket

  (reqyure "../include/cs151-core.rkt")
  (require "../include/cs151-image.rkt")

  ;; --- John Hancock Center ---
  ;; 344 m tall
  ;; with antennas, 457 m (so antennas are 113 m)
  ;; JHC dimensions from http://en.wikipedia.org/wiki/John_Hancock_Center
  ;; In the following named constants, the scale is 1 meter per pixel.

  (: jhc-mid-h Integer)
  ;; middle part height
  (define jhc-mid-h 339)

  (: jhc-mid-w Integer)
  ;; middle part width
  (define jhc-mid-w 44)

  (: jhc-tri-w Integer)
  ;; triangle width
  (define jhc-tri-w 12)

  (: jhc-top-h Integer)
  ;; topper height
  (define jhc-top-h 5)

  (: jhc-top-w Integer)
  ;; topper width
  (define jhc-top-w 37)

  (: jhc-ant-h Integer)
  ;; antenna height
  (define jhc-ant-h 113)

  (: jhc-middle Image)
  (define jhc-middle
  (rectangle jhc-mid-w jhc-mid-h "solid" "black"))

  (: jhc-rside Image)
  (define jhc-rside
  (right-triangle jhc-tri-w jhc-mid-h "solid" "black"))

  (: jhc-lside Image)
  (define jhc-lside
  (flip-horizontal jhc-rside))

  (: jhc-topper Image)
  (define jhc-topper
  (rectangle jhc-top-w jhc-top-h "solid" "black"))

  (: jhc-antenna Image)
  (define jhc-antenna
  (rectangle 1 jhc-ant-h "outline" "gray"))
It is important both to add and to commit this file. Your TA will address this point with you. Adding without committing or committing without adding are both insufficient (and both common mistakes).
Were this a graded assignment, our scripts would look for lab1/lab1.rkt in your repository, under exactly that name, at collection time.
You can inspect the individual components (jhc-middle, jhc-rside, etc.) by typing their names at the prompt in the interactions pane of the DrRacket window. (You need to have clicked on the "Run" button at the top of the DrRacket window first.)
To complete Part 1, define a value jhc of type Image by assembling a model of the John Hancock Center out of the given parts. The given components will yield a scale model if assembled correctly, at 1 pixel = 1 meter.
Note that antialiasing errors (visual glitches) in the display may cause your model to appear slightly asymmetrical or distorted. This is not your fault, so ignore it and move on.
Part 2: Choose Your Own
Choose a Chicago skyscraper and build your own scale model of it in the manner of the John Hancock Center model. Your model need not be too detailed but it must be more than a plain rectangle. The skyscrapers above are all fair game, but you are not limited to them. Whichever building you choose, take care that the scale is true. The dimensions of all of Chicago's landmark buildings are easily available through Google, Wikipedia and the usual sources. Use meters instead of feet, and include comments giving the dimension information you found.
(Note: if there is a building somewhere other than Chicago that you badly want to model, you may do that one instead.)
A note on colors: DrRacket understands HTML's named colors, a huge assortment including darksalmon, papayawhip and blanchedalmond, as well as the usual red, blue, etc. These color names can be used, as strings, with image functions, as in
(circle 100 "solid" "dodgerblue")
Googling "HTML named colors" should turn up a list of available colors.
(RGB colors can be constructed out of three integers using (for example) (make-color 100 200 100). Use this form if you need colors that aren't available through names. Note that each of the three components of an RGB color must be in the range 0 to 255 inclusive.)
When your work is complete, if we put your model of, say, the Willis Tower next to the Hancock Center, the ratio between their heights should be correct.
Submit Your Work
Please note that this is an ungraded exercise; nevertheless, work through the steps to submit the work by the deadline below as a test run for future exercises.
To submit your work via subversion, you will need both to add the file and commit it. In the early stages, neglecting to add a file is the most common error in failure in submitting work. The following command will suffice:
$ svn commit lab1/lab1.rkt -m " commit lab1"
Note this command will not work either if your current working directory is not your local copy of your subversion repository or if you haven't added lab1.rkt.
Please be aware that the hard drives of the Macintosh computers in the MacLab are wiped clean every night. Do not use them to store any files, ever. (The Linux computers, by contrast, use a network file system, and your Linux files "follow you around" the network, as it were.) We do recommend storing extra copies of your work at, for example, uchicago.box.com.
Lab 1 is "due" for all students on Thursday, September 28 at 11:59pm. We may run an automated script to check for the existence of the correctly-named file in the correct location so that we can give you feedback accordingly.