Lab 2 is due Thursday, October 5 at 11:59pm.
This exercise is designed to give you practice with conditionals and recursion. The results are visual, so, if and when you make any mistakes, they will appear clearly before your eyes.
The key to understanding these recursive functions is to appreciate the base case and the use of empty-image (the image of nothing). If you understand what's going on in that case, and why it is necessary, you are a long way toward understanding how these functions operate recursively.
In the description that follows, consider each visual example carefully, to understand the use of each argument. The type specifications are only helpful up to a point, and you must write clear, precise, informative purposes for each function.
By all means, these functions can and should call one another. They can all be written concisely in five lines of code or so, given the proper interactions between them.
Work in a directory in your repository named lab2, in a file called lab2.rkt. The lab2 directory must sit alongside the include directory so you can require "../include/cs151-image.rkt" (as well as cs151-core.rkt as before.
First, we give you this function:
  (: num-text (Integer -> Image))
  ;; produce an image of the given number
  (define (num-text n)
    (text (number->string n) 14 "black"))
This function generates an image of the text of a number. You'll need it later. More specifically, you will need to overlay it on a square background in some of the functions below.
Now write (: row-of-squares (Integer Integer -> Image)). The first argument is the number of squares in the row; the second is the side length, in pixels, of each square.
The body of this function should consist of a cond expression, with the following basic shape:
  (define (row-of-squares n s)
    (cond
      [(<= n 0) empty-image]
      ...
That is to say, the image of a row of 0 or fewer squares is the image of nothing at all.
Each square in the row-of-squares should be a black outline. Such a square is written, for example, as (square 22 "outline" "black").
Here is an application of this function: (row-of-squares 10 30)

Now write (: shaded-row (Integer Integer Image-Color -> Image)). This function should produce an image like the one in row-of-squares, except the squares should be filled in with the given color. To be able to see the boundaries of each square, overlay a black outline square on the square of the given color.
For example: (shaded-row 10 30 "red")

Now write (: alt-shaded-row (Integer Integer Image-Color Image-Color -> Image)). The colors of the squares in this row alternate between the two given colors.
ex: (alt-shaded-row 10 30 "red" "gray")

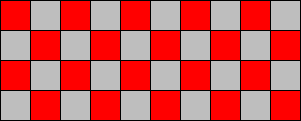
Now write (: alt-shaded-rows (Integer Integer Integer Image-Color Image-Color -> Image)). This function stacks a number of alternating shaded rows on top of one another. Furthermore, the left square of each of those rows toggles between the two colors.
For example: (alt-shaded-rows 4 10 30 "red" "gray")
Now write (: num-alt-shaded-row (Integer Integer Integer Image-Color Image-Color -> Image)). This produces a shaded row, as above, but numbers each square, starting with the number given (the first argument to the function). Use the num-text function presented above.
ex: (num-alt-shaded-row 50 10 30 "red" "gray")

Please note: if the given dimensions are not big enough to accommodate the numbers that are supposed to fit in each square, the result of this function will look a little funny. Your instructors' official stance on this, for the time being, is don't worry about it.
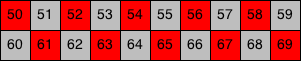
Now write (: num-alt-shaded-rows (Integer Integer Integer Integer Image-Color Image-Color -> Image). Please note that the numbering of subsequent rows resumes as you move down from row to row.
ex: (num-alt-shaded-rows 2 50 10 30 "red" "gray")
Now you're able to build images like this one:
(num-alt-shaded-rows 8 0 8 36 "ivory" "maroon")
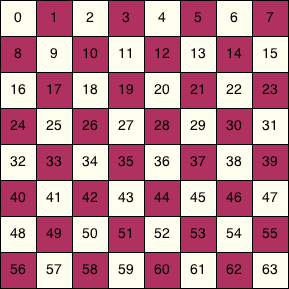
And thus you have prepared to construct eight-by-eight grids you might perhaps wish to build in certain other scenarios.
When all these function are done, you have completed the exercise. No check-expect tests are needed this week, since the results of these functions are complex images. Test your functions by running them and inspecting the results; we call these "eyeball tests."
Remember both to add and to commit your lab2.rkt file and the lab2 directory containing it.