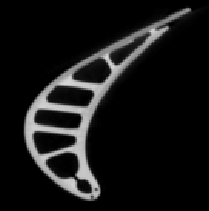
We start with the ``turbine blade'' dataset, a CT scan of a propeller
blade from the engine of a fighter jet. The turbine blade itself is
only about three inches tall. The dataset is available from GE Corporate
Research and Development10. The raw data consists of
unsigned 16-bit values; for this analysis it was quantized to eight bits
by linearly scaling the range 0 - 8612 to 0 - 255 and then
clamping values above 255. The voxels in the original data are not
isotropic; in the Z direction, along the length of the blade, the
sample spacing was half that in the X-Y plane. The data was
down-sampled in the X-Y plane by blurring slightly with the following
cubic polynomial kernel ![]() , shown in Figure 6.1,
and then sampled at every other data point.
, shown in Figure 6.1,
and then sampled at every other data point.
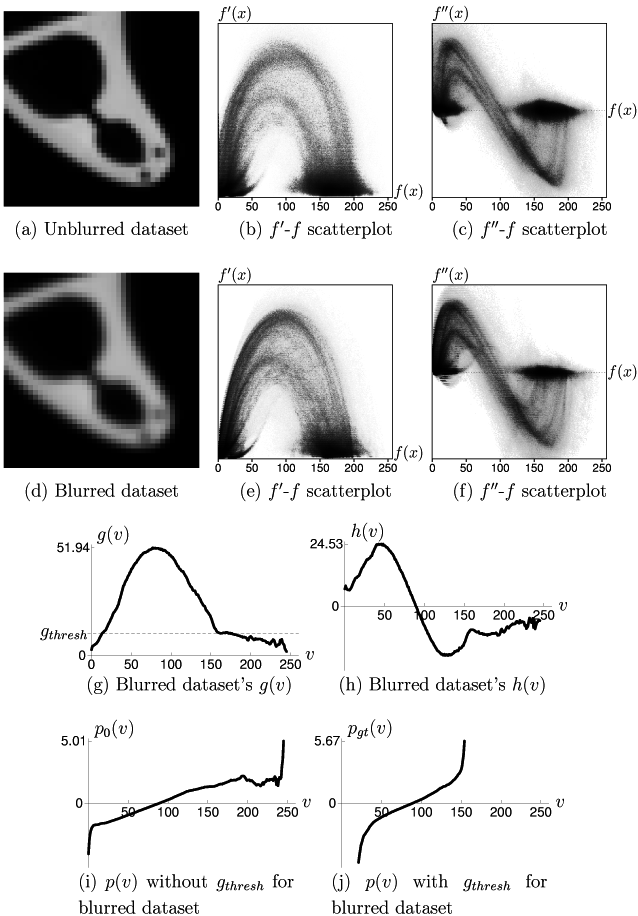
A close-up of a slice of the downsampled dataset, as well as the usual
scatterplots are shown in Figures 6.2(a-c). The
histogram volume was computed using the Hessian second derivative
measure, at a resolution of ![]() . The scatterplots show the curves
which indicate the presence of a boundary between the two major
material data values, but the curves do not quite have the shape of
those for an ideal boundary. In the scatterplot of first derivative
versus data value, for example, (Figure 6.2(b)), we can
see that the boundary curve is slightly wider and more rounded than
the more pointed parabolic shape of the ideal curve, like that seen
in Figure 4.2(a).
. The scatterplots show the curves
which indicate the presence of a boundary between the two major
material data values, but the curves do not quite have the shape of
those for an ideal boundary. In the scatterplot of first derivative
versus data value, for example, (Figure 6.2(b)), we can
see that the boundary curve is slightly wider and more rounded than
the more pointed parabolic shape of the ideal curve, like that seen
in Figure 4.2(a).
To demonstrate that judicious blurring of the dataset causes the boundaries to better match the boundary model, we convolve along each axis with the normalized Gaussian kernel
Figures 6.2(g) and 6.2(h) show
plots of ![]() and
and ![]() as calculated from the histogram volume of
the blurred dataset. Their form is consistent with the fact that
there is a single boundary: at the data value half-way between the
values for air (approximately 10) and metal (approximately 175),
as calculated from the histogram volume of
the blurred dataset. Their form is consistent with the fact that
there is a single boundary: at the data value half-way between the
values for air (approximately 10) and metal (approximately 175),
![]() has a single peak and
has a single peak and ![]() has a zero-crossing. The plot of
has a zero-crossing. The plot of
![]() illustrates the
illustrates the
![]() quantity which originated in
Section 5.2. Within the range of values for air
and metal, the gradient magnitude is not zero because of slight
measurement noise.
quantity which originated in
Section 5.2. Within the range of values for air
and metal, the gradient magnitude is not zero because of slight
measurement noise.
![]() is set (by hand) to the value of
gradient magnitude within the materials, as indicated in
Figure 6.2(g) with a dotted line. Next, two
calculations of
is set (by hand) to the value of
gradient magnitude within the materials, as indicated in
Figure 6.2(g) with a dotted line. Next, two
calculations of ![]() (with Equation 5.10) are
plotted. Figure 6.2(i) shows
(with Equation 5.10) are
plotted. Figure 6.2(i) shows ![]() calculated
without the
calculated
without the
![]() modification described in
Section 5.2 and defined in
Equation 5.10.
Figure 6.2(j), showing
modification described in
Section 5.2 and defined in
Equation 5.10.
Figure 6.2(j), showing ![]() calculated
with the indicated
calculated
with the indicated
![]() , is a much better match to the curve
we would expect for a distinct boundary. It is clear that an
appropriate setting for
, is a much better match to the curve
we would expect for a distinct boundary. It is clear that an
appropriate setting for
![]() is important for making
is important for making ![]() accurately reflect position within the boundary.
accurately reflect position within the boundary.
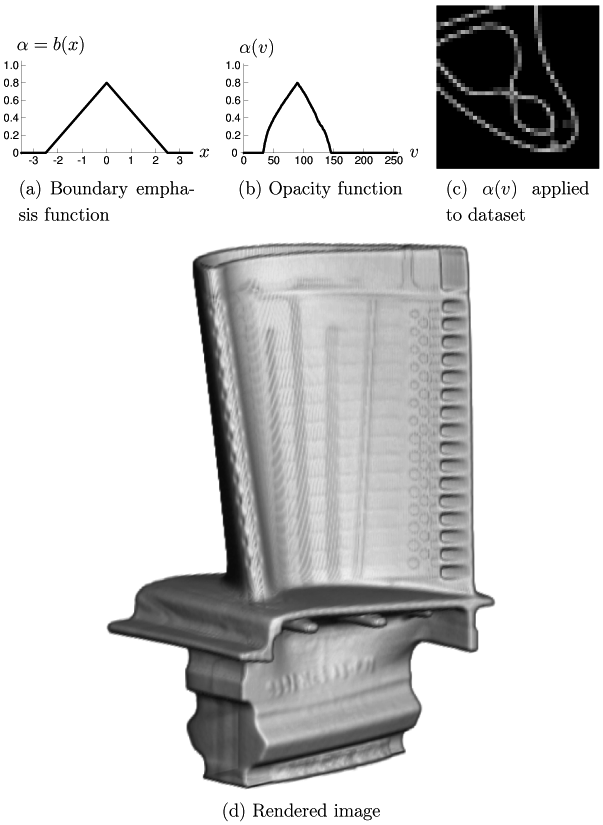
Having obtained an appropriate ![]() function, it is now easy to
obtain a rendering of the dataset which shows only the surface of the
turbine blade. Figure 6.5(a) shows the boundary
emphasis function
function, it is now easy to
obtain a rendering of the dataset which shows only the surface of the
turbine blade. Figure 6.5(a) shows the boundary
emphasis function ![]() used, which strives to makes the opaque
boundary region about five units thick (where one unit is the length of a
voxel edge). The opacity linearly ramps up to 0.8 at the middle of
the boundary, and is 0.0 at 2.5 units on either side of the middle.
Figure 6.5(b) shows the opacity function
used, which strives to makes the opaque
boundary region about five units thick (where one unit is the length of a
voxel edge). The opacity linearly ramps up to 0.8 at the middle of
the boundary, and is 0.0 at 2.5 units on either side of the middle.
Figure 6.5(b) shows the opacity function
![]() calculated (with Equation 5.11) from the
calculated (with Equation 5.11) from the ![]() and
and
![]() just described. As we would expect for a nearly ideal
boundary, the opacity function mirrors the triangular shape of the
boundary emphasis function. Since the specified
just described. As we would expect for a nearly ideal
boundary, the opacity function mirrors the triangular shape of the
boundary emphasis function. Since the specified ![]() is highest at
is highest at
![]() ,
,
![]() is highest for the data value
is highest for the data value ![]() such that
such that ![]() , which is approximately 89.
, which is approximately 89.
A minor problem with the analysis performed so far is that the
![]() calculation was not optimal. According to
Equation 5.8, with the
calculation was not optimal. According to
Equation 5.8, with the ![]() and
and ![]() calculated,
calculated,
![]() for this dataset, implying a boundary
thickness of
for this dataset, implying a boundary
thickness of
![]() . Judging from the cross-section seen in
Figure 6.2(d), this may be plausible. However if
we inspect the result of applying the opacity function
. Judging from the cross-section seen in
Figure 6.2(d), this may be plausible. However if
we inspect the result of applying the opacity function
![]() to the
same piece of the cross-section in
Figure 6.5(c), it does not look like the
thickness of the opaque boundary region is five voxels, as prescribed by
the
to the
same piece of the cross-section in
Figure 6.5(c), it does not look like the
thickness of the opaque boundary region is five voxels, as prescribed by
the ![]() used. It was found that a boundary emphasis function which
makes the opaque boundary region any thinner led to a rendering with
gaps in the surface. Rendered surface quality is also a problem when
trying to visualize the unblurred version of the dataset, since
its boundary region is so thin. Using the
used. It was found that a boundary emphasis function which
makes the opaque boundary region any thinner led to a rendering with
gaps in the surface. Rendered surface quality is also a problem when
trying to visualize the unblurred version of the dataset, since
its boundary region is so thin. Using the ![]() shown with the
blurred dataset, however, the rendered surface seen in
Figure 6.5(d) appears smooth and solid. By making the
maximum opacity in
shown with the
blurred dataset, however, the rendered surface seen in
Figure 6.5(d) appears smooth and solid. By making the
maximum opacity in ![]() only 0.8, instead of 1.0, we can see the
support struts inside through the outer surface of the blade. For
comparison, Figure 6.4 shows a slice through
the blade which reveals the position of the struts inside.
only 0.8, instead of 1.0, we can see the
support struts inside through the outer surface of the blade. For
comparison, Figure 6.4 shows a slice through
the blade which reveals the position of the struts inside.
![\begin{figure}
\psfrag{bingo}[bl]{$h(x)$}
\psfrag{x}[l]{\hspace{5pt}$x$}
\cen...
... {
\epsfig {figure=eps6/blade/spline.eps,
width=0.5\textwidth} }
\end{figure}](img176.gif)
![\begin{figure}
\psfrag{bingo}[bl]{$b(x)$}
\psfrag{hapos}[l]{\hspace{5pt}$x$}
...
...ing {
\epsfig {figure=eps6/blade/blur.eps, width=0.5\textwidth} }
\end{figure}](img177.gif)